|
|
 |
|
Project
Boss 302…
Update 4; Installation of DBA Rotors, and Painting of Calibers
|
 |
|
I know what you're thinking, as I have heard it from others many
times before…What do you need new Rotors for ? ? Yes, to some it may sound
like a waste of money to replace the factory units with new aftermarket parts so quickly. I get that, and
I see where they are coming from…But this car isn't about anything practical. If I was looking
for something practical, I would have purchased a different car or atheist a different module. The Boss
302, while being a very nice car, is not practical. At least not in the normal sense of the meaning.
I do not use this car every day.
It will never be used in a conventional way like most use their cars. This is a personal test car,
a auto cross car and mostly a fun car. So you see, the usual logic does not apply here, or at least that’s
how I see it. This subject didn't
just pop up into my head one day as I was bored and thinking about ways to spend money. Not at all, I started
this aspect of the car build as a general way to improve the cars braking ability and aesthetics as well. I
have always been puzzled by why Ford allowed the Boss 302 Brembo Calipers to be so dull and ugly. These
are some very good brake calipers. Large, 6-Piston units from the same line-up that supplies many of the
world's most revered sports cars. Manufacturers like Porsche, Ferrari, Audi, BMW, McLaren, Mercedes
Benz, Subaru, Nissan and many more that make performance oriented machinery. In each and every one of these
installations, the manufacturers has gone with the regular, brightly painted factory Brembo caliper. From
the most popular Brembo Red, to Yellow, Back, Blue and Silver standard colors or sometimes with a special event color chosen
by the buyer. Also, in every case the Calipers were chosen not only with the beautifully painted, and highly
clear coated colors, but they also wore the standard Brembo decals with custom features like Stainless Steel hard lines connecting
the right & left sides of the caliper. This represents a overall package that is the quintessential
Brembo Big Brake Package. The look is undeniable, and shouts High Performance. But,
what did Ford put out to its car buying crowd? That same car buying crowd that is willing to spend more
money for the performance oriented packages and options, that make these cars special and amazing all at once?
A dull, almost road grime dirty looking painted caliper, that is to say the least, less then inspiring.
You see it's not just a color issue here.
It's not even just a personal taste issue, or a bling issue. The real beef lays in the fact
that on every other car in the world fortunate enough to where such a high performance brake system, those brake calipers
come in a glossy, clean , bright color. This has come to be expected by great aftermarket braking systems.
Who doesn't love the famous Yellow Brembo calipers that peek thought every real road worthy Porsche?
The bright Brembo red calipers that the Corvette, and Ferrari's wear? Or the Blue Brembo calipers
from all higher end Audi's? Here's the rub…You have the best track car Ford has built, ever!
They do the things we wanted them to do for years…They took the time to re-create the original Boss 302, the
famous Road Racer from the late 60 early 70's that beat the best of the best at their own game, and on their own tracks.
They put all this thought and detail into a car that speaks performance with every corner or view, but somehow forgot
to use a regular color available from Brembo. This was no mistake, for someone had to specify this horrible
color, and I guarantee it wasn't on the Brembo end of things. Why, Why Ford would you allow this ugly,
dull, OEM like color to grace these Calipers? Only Ford management knows.
People that own cars like this are much more picky and detail oriented then someone seeking daily transportation.
These Calipers look dirty, right off the showroom floor, much less after a little use. It's
just a small thing, but of all the small details to leave out, this is the most obvious and cruel. Personally,
I feel responsible for my car, how it looks and the maintenance it receives. These Calipers make it look
as though I neglect by car, like I'm too lazy to keep them clean or something to that effect. You see
them in beautiful contrast to the other parts on all other performance cars, so people expect that on this one, that makes
for a disappointing view. Well, not any longer, as I'm
about to correct what Ford fudged up. Honestly, the Calipers are only missing the right paint, as they
are the same HP brakes used on most other performance cars. So it's not like you have to change out
parts for better parts, or more expensive parts. The original parts were plenty strong, repeatable, durable
and aggressive…it's just the color that Ford did not bother to research and get right. What
a shame, as this would have been a huge and important psychological purchasing factor for many. I am torn
between the most popular color of Brembo Red for my Calipers or Yellow. I am leaning toward the Yellow,
but of those I have asked there opinion on the matter, they all prefer the Red. Either one will be
a huge improvement no matter how I go, it's all really about making the right choice that matches and compliments the
car. Our Boss is School Bus yellow, so you see the delimbia. Besides the caliper issue, I also want to modify the brake system like it should
have been modified from the start, and that includes adding in new Rotors, ones that have several upgrades and performance
features. The Rotors I have purchased for the job are from DBA, or Disc Brakes Australia, an Australian
Disc Brake maker that specializes in HP Braking Systems. The Rotors special features are mainly the two-piece
design. Most Rotors are of a single piece cast from simple cast iron, these Rotors are heavy and very durable.
Production cars wear them as they cost much less to produce and are very durable. But in a performance
setting, those Rotors and or stock Calipers would soon be over-whelmed by any type of aggressive braking.
The DBA Rotors are special made to assist in the cooling of the brake system while in use. They
have cooling vanes that allow air flow thru the Rotor itself, and this helps keep the system from overheating.
The material used is also much stronger and durable than regular cast iron Rotors. The hub, or center
section of the Rotor that mounts to the suspension, is made of aluminum and is a separate part from the main Rotor body.
This means the total weight of the part is dramatically less than a single piece cast iron Rotor, and it make the part
serviceable. Meaning it can have the Rotor section replaced at a considerable savings as replacing the
whole part. Same goes for the hat, it something would happen to it, you could replace that with a new one
and go ahead and continue the race . Because the part is two pieces and those pieces being of lighter materials,
the end product is a stronger and lighter part, yet repairable. The Rotor itself, is also available with
several up-grades, as in the drilling and or slotting of the Rotor disc surface. This process makes the
Rotors lighter and also helps with braking, as the un-uniform surfaces give the hot gases from the pads a place to dissipate
and not get trapped between the pad and rotor surface. Disc brakes use friction to work, in the generalist
terms, the pad squeeze the disc rotor and rotational energy is transformed into heat energy by the physical braking action.
Since we are converting rotational energy into heat, the brakes get very hot. Basically, the faster
you have to stop the faster the temperature rise in the Rotors and braking system, again another reason why lighter better
cooling more efficient brakes are so important. If allowed to overheat, braking efficiency is severely
diminished. As such, when ever thinking about making a change to any braking system, you have to look at
the effect that change will have on the entire system, not just the single part your replacing. It's
always a TEAM that wins.. Other items to consider, would be the need for better fluid, more or additional
cooling, different pads, and maybe increased maintenance. More aggressive pads will make more heat, so
cooling and the brake fluids boiling point may come into play. Mounting larger then stock Rotors may also
effect the tire/wheel combo you can run. Most Rotor changes would mean same or larger diameter Rotors being
installed, this may affect wheel clearance, and should always be checked. Generally we want more pad contact,
and to get that we generally need larger Rotors. The more surface are you have the less brake pressure
you need to apply to get an equal stopping force. Since all braking system are hydraulic, we are dealing
with simple functions of area (square inches) and pressure (PSI).
|
 |
|
Front Disc in Black
Rear Disc in Gold
 I want to change out the OEM Rotors with much more suitable DBA series 5000
Rotors for better performance and aesthetics. The change on the Calipers will be in the form of new paint,
special Brake Caliper paint that will mimic the factory Brembo paint colors, complete with decals and details.
For now, I will keep the stock OEM brake pad and Brake lines as those are very suitable. The Rotor
part Number I will use for the front Rotors is, DBA 52124GLDXS, and DBA 42114XS for the rear. The 5000
series is the 2-piece design that comes in both slotted and drilled styles, while the GLDXS indicates the Hat and rotor middle
will be coated with a gold color. You can chose from Gold or Black, and I think the Gold will liven up
the dark area around the brakes and my Black wheels. The rear rotors are of the 4000 series, they are not
of the 2-piece design, but match the front other than that detail. In the picture below, you can see a
series 5000 rotor in Black, the green, orange and red paint on the exterior of the rotor's fins is for determining your
brake temperature. The paint is designed to turn colors at a specific temperature, so my looking at the
three strips after an outing, you can determine how hot the brakes got that time.
PAINTS COLOUR
|
TEMPERATURE OF TONER
|
NOTES
| Green | 430°C | Can change completely | Orange | 560°C | Can change over of the braking surfaces | Red | 610°C | Can change only near the braking surfaces |
The smaller insert is the Gold 5000 series rotors, you can see how
much brighter they are then the black version of the same rotor in the last photo. I think this will like
very nice contrasted by the black wheel. We will have to see if I am right… To
pull this off, I sent off to a dealer that specializes in Brembo calipers, both selling and re-building them.
He was able to supply me with the correct decals, and trim I need to make this look as professional and factory (not
from Ford that's for sure) as possible. Since we ate starting with a newer car that only has about
335 miles on it, the process will be much easier and simple compared to a car with many more miles and age in its brakes.
Since the brake system is subject to extreme temperatures, weather, and brake dust, the parts tend to dirty and corrode
quickly if not cleaned. This requires most calibers to be torn down completely and sand blasted clean.
Then you have to rebuild the caliper with a re-build kit, to replace the seals and rubber boots that protect the pistons.
In our case, the caliper simply require a little cleaning. Mainly with brake cleaner and a good
stiff brush, maybe a wire brush a few places to remove the baked on brake dust and road grim. I have worked
with really old calipers before, and it can be a time consuming and dirty job, but in this case, it will be simple and quick.
Once everything is clean, I will lightly sand the surface with a sand paper, we need to create very small scratches
in the existing pain so the new paint has something to hold onto. If not, there is a good chance the paint
may start to peal, which would require us to re-do the calipers and waste more time and materials. We will
use 2 grades of sand paper, a rougher 120 grit and a final smoother 400 grit, this will allow us to sand into the paint finish
for grip, but not so rough that we leave marks or scratch marks that will come through the new paint when dry.
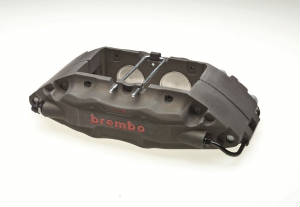
Below is a picture of a new Ford Boss 302 Brembo caliper.
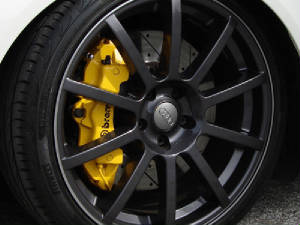
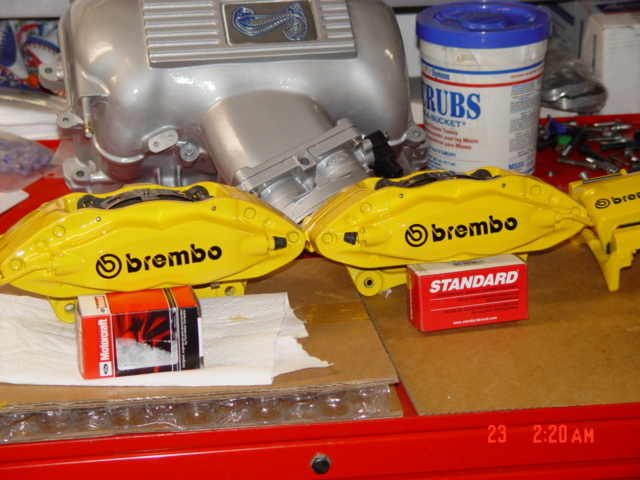
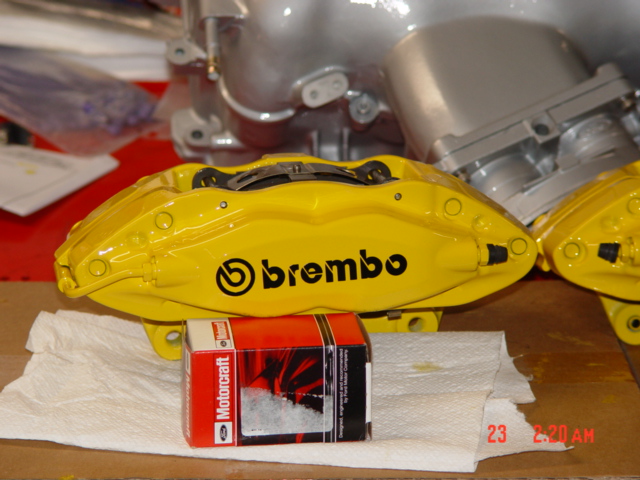
It's hard to believe but this is a new HP brake caliper that looks as racy as a chuck of coal. Compare
that same exact caliber to the one in the picture next to the dirty looking one. Yes they are from the
same family, but this one has been coated in a yellow Brembo color, and looks completely different, and more what you would
expect to find on a car like this.
  Once the surface as been smoothed, we will clean the parts one final time and then we will be ready to apply
some paint. Remember painting is 90% preparation, so take your time and get it right. Painting: I removed the Front & Rear Brake Calipers
from the car the same day we went to the garage to install the WhiteLine Watts Link, Swarr Bar and WhiteLine Rear Sway Bar.
As of this date, I still do not have the Front DBA Rotors, so it looks as if the car will just stay on the lift till
we get back from Miller Motorsports Park, in Salt Lake City Utah.
The Calibers only had 408 miles on them when pulled, so really the only grim was some light brake dust.
However, I still needed to get down to aluminum so the calipers went for a bath in my sand blasting cabinet.
I used glass beads to remove the grime and black flat paint the calipers were painted with. Just
be sure to strip the calipers down, and plug the fluid ports so no contamination will occur. I also, masked
over the pistons, and rubber parts. It was very quick, about 2 minutes each, and they were clean as a whistle.
Now I just cleaned the surface with a wax & grease remover and masked them up. On the rear calipers
I covered the emergency parking brake bracket, lever and spring. I did not want to have any sticking problems
with the moveable parts, so they will remain black. Painting
was on a early Saturday morning, the weather was hot, calm winds and no chance of rain, in other words…Perfect for
painting. I gave them all a coat or two of sealer, then 4-5 coats of yellow urethane, followed by about
3-4 coats of clear. I generally always use a 2-part urethane paint, as it holds up very well to the elements
and everyday wear. Make sure you take the proper pre-cautions if painting with such a toxic substance!
Also, I generally use House of Kolor, Imron or Summit Racing's Urethane paints. The quality
of paint is almost always directly related to the cost, so expect a job like this to cost more than you might otherwise budget.
My total materials cost was about $325.00. Now I didn't use all the paint, but the lowest denomination
in which you can purchase this paint is of the one quart size. Too that you need Activator, Reducer, Spray
Materials like disposable cups, mixing containers, mixing sticks, ratio mixers (this paint was mixed with a ratio of 4:1:1),
and the usual clean-up supplies like paint thinner, gun cleaners and so forth. Not to mention the hoses,
spray guns, adapters, mixing adapters, gauges, regulators and safety equipment. Hopefully you have most
of this stuff, or it might be much cheaper to have a shop paint the calipers for you? Personally, I love
to paint. So, I don't mind the time, preparation and work it takes to do this, you might or might not?
I generally like to take advantage of my time, and group things that need to be painted into one session.
So this time, I had the calipers, but I also had a factory Sway-Bar from the Boss 302 and about 12 engine parts from
another recent project that needed painting. After all, it takes a lot of time to get everything out, set-up
and ready to paint, so managing my time is as important as doing a good job. Once set-up, which took at
least an hour to an hour and a half, I mixed up the Sealer. I used a House of Kolor Metallic Silver Sealer,
it comes in Grey, White , Black and other colors, but I choose the metallic because I had Silver metallic parts to paint and
a few Blue Candy parts as well, this will cover all parts I have and the metallic in the sealer will help with the final color
of the candy parts. Seal is there to protect the new paint from anything that might bleed thru or not coincide
with the new paint. It seals out the old in preparation for the new. 2-3 full coats
is plenty, and this flows very nice, you don't have to worry about runs generally with sealer, as it coats very well.
Normally you have to allow the paint to flash, or surface dry…but in today heat, the paint ws ready as soon
as I was. Next I shoot everything that was Silver Metallic, then moved on to the Yellow and then finally
the Blue Candy….then clear coated everything we had. Most paint was applied pretty heavy in about
3-4 coats, except for the candy which took 6-7 to get the color I needed. You have to apply paint much
heavier in full sun, as the paint dries so fast and the parts have a lot of heat in them. If you simply
apply a regular or light coat, the paint will dry to fast, and not flow out correctly, and you will end up with a lot of orange
peel. For what we were doing, it turned out pretty good. One larger pieces I would have
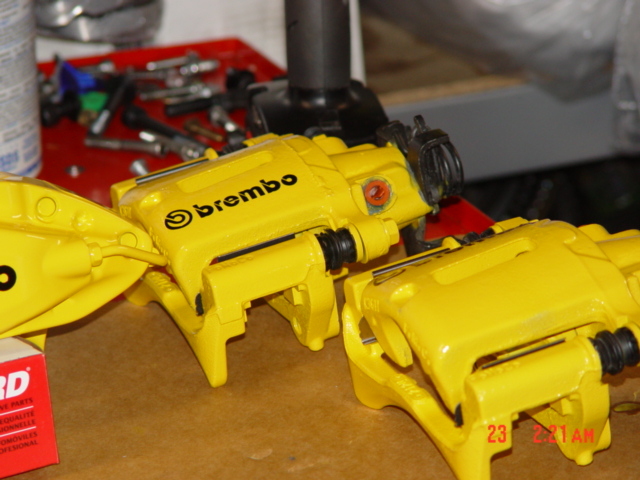
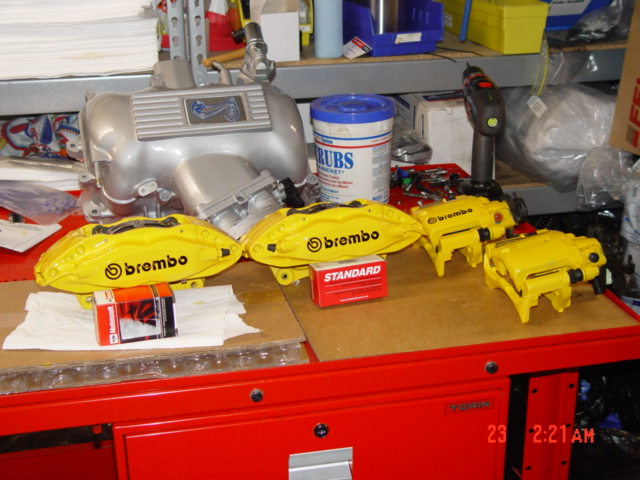
had to put up a canopy to cover the parts from the direct sun light. The Final Look:
    |
 |
|
|
 |
|
|
|
|
Pro Weld
5937 Ethan Drive
Burlington, KY 41005
859-586-4069
Proweld@myway.com
|
|
|
 |

