The Supercharger System
The Supercharger Assembly

Above: Who doesn't have a soft spot for a V-8 with a Supercharger!!!
The most obvious part on the whole Engine, is,.... yes
you guessed it,.... the Supercharger. Just the look of it sends chills down
the performance minded guy’s spine,,,This is the main difference between the 03-04 Cobra and the rest of the Cobra family.
Of-coarse, by now you have learned that there are many differences that make the 03-04 Cobra special, it’s just this
one piece tells the world who it is and what it can do!
The Supercharger
is relatively a easy piece to get, there are many on E-Bay to purchase, every time I visit the site. The main problem, is
trying to purchase a good, useable, and complete piece....that’s the difficult part. These Superchargers
are still available from Ford, and while they
are very expensive, listing in the $12-1300.00 range, they are useable from the get go. The units on E-bay, at least the majority,
have to be rebuilt before they can be re-used. Yes, the adds might say different, but any Supercharger
with that many miles will need rebuilding.....Period....so make sure you budget for it. Yes you could bolt the used piece
onto your new Engine and it will work, meaning it will turn and might even produce some boost, But it will not produce the
right amount of boost or power a new unit, or re-built unit will. You will be less then impressed with your new Engine, to
say the least. The rebuild process is not that complicated, at least not if the core is still useable. A good company like
Stegmieers, will rebuilt the front drive and re-coat the rotor tips to bring the Supercharger back to like new performance.
They can also Port the Blower for even better performance, as well as Polish the blower
for out standing looks. I have used there services and whole heartedly endorse them.
The
Blower sit on top of the Lower Intake Manifold, and is held there by 10 bolts. Between the Manifold
and the Blower is a special gasket, who’s purpose is to seal the two piece against leaks. This gasket
is always replaced when the blower is separated....no exceptions. It is a very thin metal gasket that has a raised bead all
the way around the gasket and this bead gets flattened when the two are tightened down against one another.
The bottom line is you can buy new and bolt it on, or you can buy used and send it out for a re-build, then bolt
it on. The choice is yours to make, just be sure to know the options and budget accordingly.
Supercharger Assembly
2R3V-6F066
Accelerator Cable Bracket
This small
bracket sits on the passenger side of the Supercharger assembly, and is used to secure the end of the accelerator
cable. I have never seen one of these for sale on E-bay and would advise to just purchase it from Ford, they are not expensive.
Accelerator Cable Bracket
2R3V-9726
Lower Intake Manifold
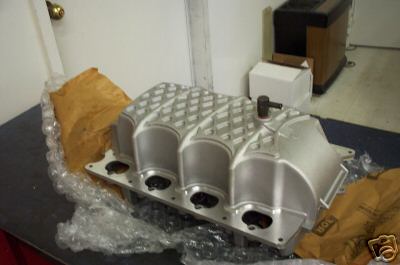
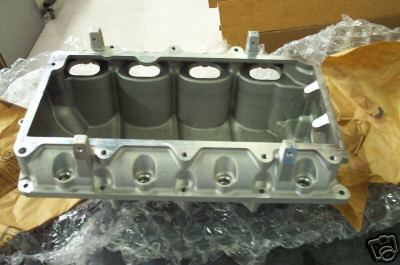
Above: The Lower Intake Manifold
is a huge piece, and is really something that doesn't normally wear. This is a shot of a new one which will set
you back about $700.00, while Ford still
sells these, they are sometimes listed on E-Bay.
The Lower Intake Manifold is the part the Blower sits on and is bolted
to. This part is very large and is made form Cast Aluminum. While very protected, you have to make sure the
sealing surfaces are OK, and that the bottom of the Intake Manifold is not damaged.
While it is rare, I have seen several Engines where a Rod has let go, taking the block and Intake Manifold with it. This is
just something to check. These are also on the rare parts watch list, and when found always bring top dollar. It’s a
good ideal to buy one anytime you find one at a reasonable price, regardless of weather you plan to build your own "Terminator" Engine or not, they are money in the bank. The Intake
Manifold requires 2-gaskets that seal the passage from the Heads to the Intake
Manifold, and always start with new gaskets. There are 10-Mounting Bolts that secure the supercharger to the
Manifold and another 10-Mounting Bolts that secure the Intake Manifold to the
Heads.
lower Intake Manifold
2R3Z-9J447
Manifold Mounting Bolts (10 Req’d)
Supercharger Charged Air Cooling System
This is a Sub-System of the Supercharger system, and we
will examine this system at a higher degree. The Sub-System is made up of the following parts:
The Inter-Cooler or Charge Air Cooler
The Inter-Cooler Tube Assembly
The De-Gas Bottle
Water Pump
System Plumbing
Front Mounted Cooler
We have already talked about the Charge
Air Cooler or Inter-Cooler as it is known by most. This assembly also includes the Coolant Intake Manifold
and it's gasket. This group of parts consist of the Manifold, 2-small tubes, each
with O-Rings attached to them, and a Gasket. This group of parts has the duty of allowing
coolant to pass into and from the Inter-Cooler without allowing a leak of coolant or air. The Coolant Intake
Manifold, it's gasket and Twin-Tube assembly are very hard items to find used. If you do find these, make
sure the unit is complete, as they are also expensive and hard to get from Ford.
De-Gas Bottle
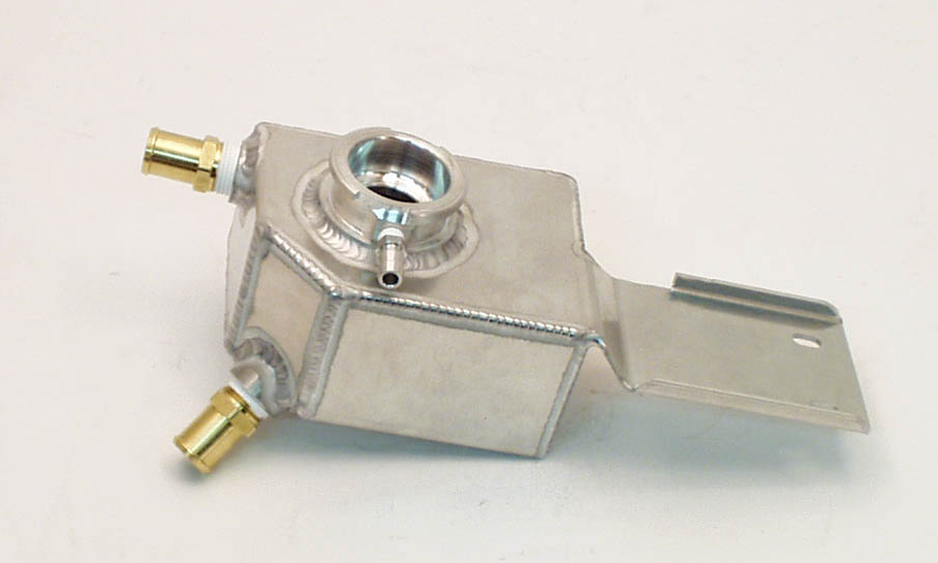
Above: This is the Canton De-Gas Bottle,
while made completely from Aluminum it can be polished fro a incredible shine. The Factoy piece is plastic and fairly easy
to come by.
The De-Gas Bottle has the responsibility of allowing
traped system air to escape and allowing the owner to re-fill the system with clean freash coolant. The original system
uses a plastic De-Gas Bottle which can be replaced by a Canton Aluminum unit pictured. I have seen
this item on E-Bay cheap, but not many of them. The Canton unit is readialy available and can be polish to a rich luster.
Make sure the De-Gas Bottle is locate at the highhest point in the system, and remember, you have to be abile
to access it for system replinishment.
Front
Mounted Cooler
The Ford
unit mounts in the front fashia, behind the bumper cover. There are stock replacement pieces and several high capacity
units out there for sale. I would consider a higher capacity unit way before I purchased stock unit from the factory.
For those installing this unit in a Hot Rod or Street Rod, you may ellect to not use the De-Gas Bottle or
Front Mounted Cooler from Ford, and instead use a
small Radiator. I have used small Motorcycle Radiators or even small
Car Radiators from Honda to serve as both Cooler and Filler piece.
The main thing is, you have to get the Cooler into the air flow, in crowded locatuion you might think about
using a Electric Fan mounted to the Cooler to draw additional air flow. If placed right, a small radiator
can serve as cooler, de-gas bottle and filler.
Electric
Water Pump

The Water Or Coolant Pump is a seperate
and dedicated part that only serves the Intake Charge Cooling System. This Pump is
manufactured by Bosch and opperates on standard 12 Volts Electric. It is controlled by a Coolant
Temp Sensor that senses Inter-Cooler Coolant temps and switches on or off independently of other vehicle functions.
This is a very popular item on E-Bay and generally sell for $90-100.00. Again there is no need to use a old Pump.
Twin Tube Assembly
and other
Cooling System Hoses
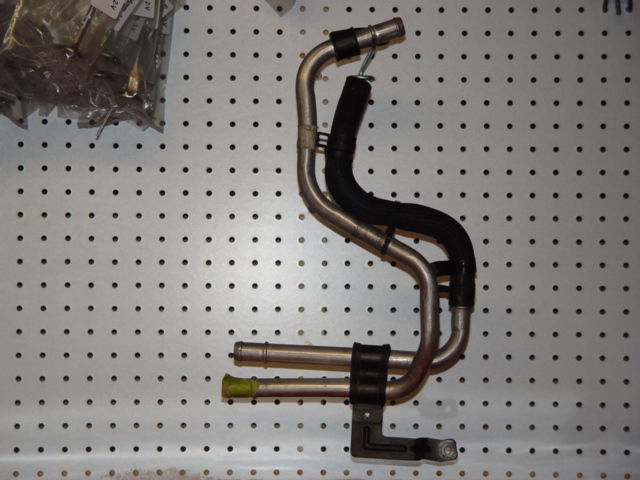
The Twin-Tube Assembly is located
in the passenger side front of the Engine. It takes both incomming and out going coolant down the side of the engine
to where it will connect with the System Hoses. The Assembly keeps the coolant protected
and well dressed. I have many times abandoned this assembly and simply attached my Performance Hoses
right at the Coolant Manifold. This elliminates a lot of engine cluter and keeps the hose connections
to a minimum. You will have one hose that runs from the outlet side of the Manifold to the De-Gas Bottle,
or Radiator (depends on your arangemnt) then one hose from the De-Gas Bottle to the Front
Mounted Cooler. Another hose from the Front Mounted Cooler to the Coolant Pump,
then another hose from the Coolant Pump to the Inlet side of the Manifold. While the
Twin-Tube Assembly has it place, especially on a stock vehicle, it also adds many un-neccessary connections.
Fuel Injectors
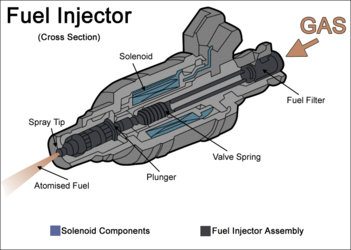
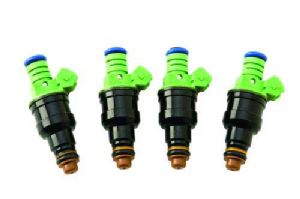 Above: This display will help list the many working parts of a modern Fuel
Injector. The (Green) Ford
Fuel Injectors are the popular replacement for the standard (Blue) Fuel
Injectors that come with the stock 03-04 Cobra Engine.
The
Fuel Injectors are another item that is specific to the 03-04 Cobra Engine.
They are 39lb/hr rated Fuel Injectors(Blue in Color) that produce a special
Dual-Pattern Spray Cone. This unique Spray Cone is designed to lower emissions and help
with Fuel Economy, by directing the fuel spray pattern towards the back of the Intake Valves. This is another item that is
normally tough to find on E-bay, but I have seen them from time to time. The popular route is to abandon the stock Fuel Injectors in favor of some Ford 42lb/hr
Fuel Injectors. These do not have the Emissions Fuel Spray Pattern,
and make considerably more power then the stock units. Since the stock Injectors
are fairly rare, the performance Injectors are only slightly higher then new
stock units, and make sensible new replacements. I have always replaced the 39lb/hr injectors with the newer 42lb/hr units.
You will have to modify the EEC or Computer fueling tables with the new 42 lb Injectors,
which isn’t a big deal.
I would never use old, high milage Injectors
on a new Engine, it makes no sense. Fuel Injectors have a small O-Ring top and
bottom to seal them, make sure your Injectors have this item and that it’s
in good shape.
Fuel Injector
2R3V-9F593
Fuel
Injector Supply Manifold
Or
Fuel Injector Rails
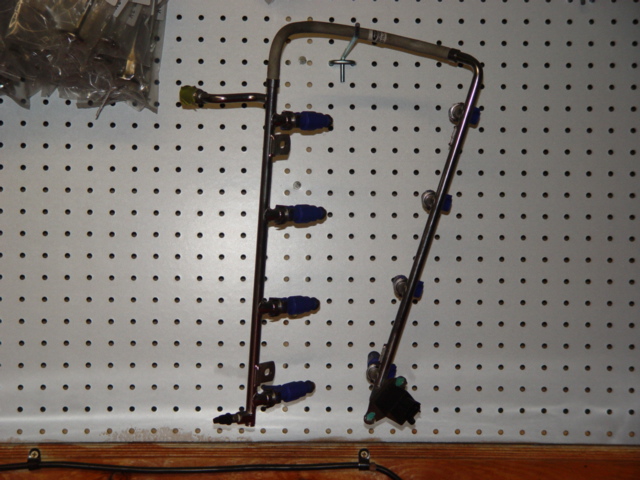
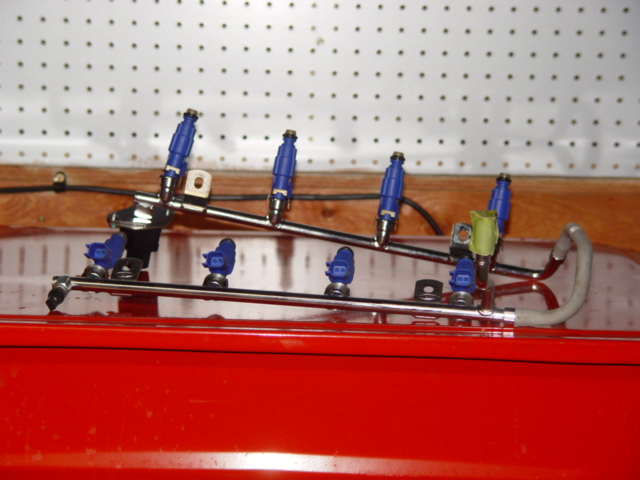
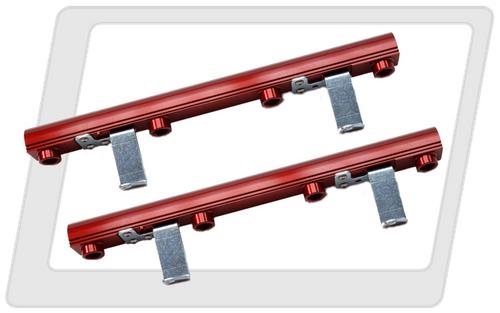
Above Top: This is the Stock and very restrictive Fuel Injector
Supply Manifold. Above: This is the good looking Aeromotive Fuel Rail
The Fuel Injector Supply Manifold used
on the stock 03-04 Cobra Engine is very restrictive. It consist of a very small steel line, one for each side, connected by
a rubber hose. This is one item I would throw in the trash, and replace if I was building a 03-04 Cobra Engine and had this
piece. In it’s place I would install a nice Aluminum Fuel Rail, like the
ones Aeromotive or similar manufactures make. These not only look nicer,
but flow tons more fuel and will really wake-up that Cobra Engine. The stock 03-04 Cobra uses what is known
as a Non-Return style Fuel System. This means the Fuel
drawn from the Fuel Tank is on a one way trip to the Fuel Injectors,
the system uses a Pressure Transducer and Computer to very Fuel Pump output to meet Engine
demands, and the Fuel will wait till the Engine needs it, resting inside the Fuel System Lines, Rails and
Filter. On a Return Style System, the Fuel is drawn
from the Fuel Tank and sent directly to the Fuel Rail, there the Engine uses a portion of
the Fuel and what is not used is sent back to the Fuel Tank. In this system the Fuel
Pump is always running at full speed, and the Fuel Pressure Regulator is responsible for determining
how much Fuel gets returned to the Fuel Tank. There are pro’s and con’s to both
systems, but it is generally agreed on that the Return Style Fuel System is
more High Performance Oriented and makes more Power.
I have used with exceptional results, the
Kenny Bell Adjust-A-Pump, Fuel Pump Booster. The system uses a transformer
to raise secondary voltage to the Fuel Pump, which makes the Fuel Pump, Pump faster for
more Volume and Fuel Pressure. This System works great and only increases the Fuel Pump Output
when needed, like when Boost pressure is High.
Fuel
Injector Supply Manifold
2R3V-9F792
Fuel Pulse Damper
2R3V-9C986
Vacuum Activator Valve
This piece,
the Vacuum Activator Valve, Is located on the drivers side of the Blower up
on top. It is there to protect the Blower from back fires and sudden pressure spikes. It also allows the blower to "Free
Wheel" when load is low, saving some much needed fuel for better Fuel Economy. This Valve is usually
included with the Blower, but watch for broken or cracked Valves, as the unit is made of plastic and often gets damaged in
transit. RPM Outlet, a great source for Cobra Parts, has a free diagram
on how you can modify the Valve for better performance. You can check them out at: http://www.rpmoutlet.com/boost%20bypassc.htm
While there check out there great selection of 03-04 Cobra parts, not only are
they one of the Cheapest part sources around, but they have excellent customer service!! I have used them many times with
great results.
The Activator Valve mounts to the
Vacuum Accessory Bracket along with the Manifold
Absolute Pressure Sensor, Differential Pressure Feedback EGR System, and Exhaust
Gas Recirculation Vacuum Regulator. Most eliminate the EGR System when
they build one of these Engines, but you may or may not decided to keep it in tact. If you do you will need the Associated
parts for the EGR System which I will list below.
Vacuum Activator Valve 2R3V_6F089
Bolts (2 Req’d)
2R3V-N605892
Exhaust Gas Recirculation Tube 2R3V-9D477
EGR Valve 2R3V-9D475
Manifold Absolute Pressure Sensor
Differential Pressure Feedback EGR System 2R3V-9J460
EGR Vacuum Regulator 2R3V-9J472
Throttle
Body
and
Spacer
Tube
and
Spacer
Tube
and
Spacer
Tube
The Throttle
Body is located on the Passenger Side top of Engine, it is connected to the Blower by the Spacer
Tube. The Throttle Body is designed
to Limit the intake of air, and it does so by opening or closing it’s two large intake plates or more commonly known
as "Butterflies". Attached to the Throttle
Body are the TPS or Throttle Position Switch and
IACV or Idle Air Control Valve. The TPS allows the EEC or Computer
to know the position of the throttle body butterflies, and the IACV is adjusted
by the EEC or Computer to maintain a steady and smooth Idle.
The Throttle
Body and it’s Spacer are very popular items on E-Bay,
and for good reason, most replace the factory units with better performing pieces from makers like BBK
and Accufab. There produces have larger openings for more
volume and come polished or chromed, for supper good looks. If I was pressed to purchase a new unit, it would be one from
the aftermarket, and not a stock ford part.
Idle Air Control Valve
2R3V-9F715
Idle Air Control valve Gasket
IACV
Mounting Screws
Spacer Assembly
2R3V-9P697
Throttle Body Gasket
2R3V-9E936
Throttle Body
2R3V-9E926
Bolts (4 Req’d)
Bolts
(2 Req’d)
Throttle Position Switch
2R3V-9E929
Nuts (4 Req’d)
2R3V-N804178
Studs (4 Req’d)
Spacer
Assembly Gasket

